
11 Top Tips to Get your Google Ready to Go Back to School 2015
30 minutes Now Will Save You Hours During the School Year- Get Google Back to School Ready!
If you haven’t begun to already, you’ll soon be inundated with back to school sales and specials to get yourselves and your children ready for the new school year. Already? How is this possible? It seems like summer just started!
It might seem like you have some time before you need to start worrying about preparing for a new group of students, faculty meetings and open houses. But, the reality is once the school year begins, many of our best intentions to prepare and organize things ahead of time get further and further away from us.
So Save Me Some Time Already!
The curriculum integration team at Forward Edge has come up with 11 tips that will take you 30 minutes or less to set up now, and will save you countless headaches and hours throughout the school year.
You’ve Got Mail
What time does the meeting start? Which parents said they couldn’t make it to their conference? Who emailed the staff about free kittens…again?
Email can become a giant, time-sucking, vacuum if you don’t have it set up and organized. The tips below will help you organize your Gmail inbox.
- Priority Inbox-
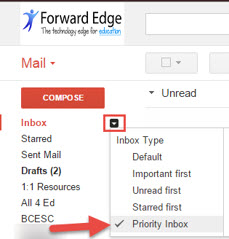 There’s another (better) way to organize your inbox than to just have all emails lumped together in one, never-ending inbox. Priority inbox can be customized in your email settings, but right out of the (in)box, your unread and important emails will group together at the top of the inbox, all starred emails will group together below that, and at the bottom “everything else” will be grouped together. This ensures that you never miss an unread email or something you’ve flagged as important and need to follow up with. Through personal preference, I changed mine to only show unread emails at the top (not unread and important), and I star all important/follow up emails to show up in the starred section. I added an additional section with a chosen label (I did this in my settings. More on labels in tip number 2) and then everything else is below that. To switch to priority inbox right away, click the arrow to the right of Inbox and select Priority Inbox under inbox type (pictured). You can customize your priority inbox in your inbox settings under inbox. If you don’t like it, you can always switch it back.
 - Labels
 – Many people who switch from another environment to a Google environment have trouble adjusting to Gmail, which essentially does not have any folders (or at least folders as we traditionally think of them). I will admit this took me a minute to get used to, but now I love it. You can apply multiple labels to one email. Now you can stop waste any time looking through five folders in a couple weeks when you try to remember the single folder you must have filed that email in. You can create and apply labels in multiple ways. Just look for the label icon at the top when you select emails in your inbox or when you have an email open (pictured). You can also manage multiple labels at once from your settings. Think of some labels you know you will need throughout the year and make them now. You can always add new ones as you go along. Below are some ideas to get you started.
- Principal Emails

- Parent Correspondence
- Each Course/Bell you teach
- Teams/Clubs you moderate
- Department Emails
- State Testing Information
- Faculty Meetings
- Committees
- Principal Emails
In addition to applying multiple labels, you can also color-code your labels. Just right-click the label name in your inbox and choose label color (pictured).
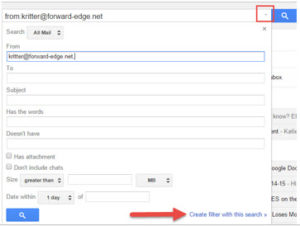
- Filters- Filters go hand in hand with labels. You can create filters in your inbox to automatically apply labels to emails from a specific person, with a certain subject line, and
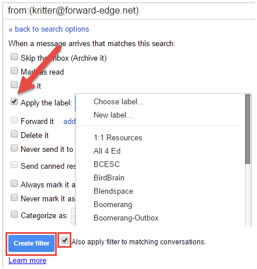
 much more. Never waste time going through your inbox looking for an email from the superintendent again just by applying a filter to automatically apply the “Superintendent” label to all emails from the superintendent’s email address.As with everything else in Google Apps, there are multiple ways to apply filters to your emails. The quickest way is to do it from the search bar at the top of your Gmail by clicking the arrow to the left of the blue magnifying glass after performing a search (pictured). This will automatically populate the “from” column with the email address. Click the create filter with this search in the bottom right, and then select the action you want to take, such as apply a specific label (pictured).
 much more. Never waste time going through your inbox looking for an email from the superintendent again just by applying a filter to automatically apply the “Superintendent” label to all emails from the superintendent’s email address.As with everything else in Google Apps, there are multiple ways to apply filters to your emails. The quickest way is to do it from the search bar at the top of your Gmail by clicking the arrow to the left of the blue magnifying glass after performing a search (pictured). This will automatically populate the “from” column with the email address. Click the create filter with this search in the bottom right, and then select the action you want to take, such as apply a specific label (pictured).
Google Chrome: Saving Time While You’re Online
Have you ever had to switch to a new computer, whether it crashed on you or you volunteered as tribute to pilot a new device? You lose your bookmarks, your settings, your home page and everything else. It’s a pain setting everything back up just the way you had it, right? If you haven’t already, stop what you’re doing to complete tip #4 to prevent the above from ever happening to your Internet browser again.
- Log Into Google Chrome– Google Chrome allows you to sign in to the actual browser, which will save and sync all your Chrome settings. That means bookmarks, extensions, themes, settings, browsing history and more! To log into Chrome, click the three horizontal lines in the top right of your browser and scroll down to settings (you may see something that says “sign into Chrome,” which you can select). At the very top of your settings screen is Sign In, and you will either see the option to sign in with your Google account, or it will tell you which account you are already signed in as.
Now that you are signed in to Chrome, let’s maximize some of the time-saving features the browser offers.
- Extensions– Extensions extend
 the functionality of Chrome for just about any website. Extensions live to the right of your omnibox (the omnibox is Google’s name for the address bar) and can do a number of things. If you have never been to the Chrome Web Store to browse through the available options, I suggest you take a few minutes to do so. I have listed a few of my favorite extensions below as a starting point for you.
- Extensity– While extensions can save you time and speed up your productivity, running too many at a time can slow down your computer. Extensity allows you to quickly turn on and off extensions that you don’t use all the time without leaving the current webpage (pictured).
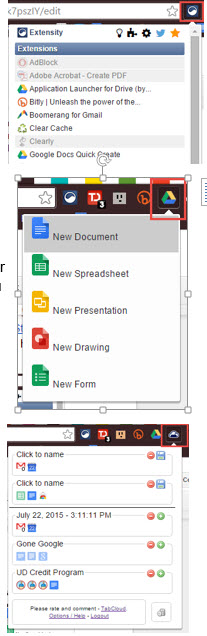
- Google Docs Quick Create– This is a mustfor any Google Drive/Docs user! Google Docs Quick Create allows you to create a new Google Document, Spreadsheet, Presentation, Drawing or Form just by clicking the extension (pictured). You don’t even have to waste time opening a new tab or window, because the extension will do that for you!
- TabCloud– If you’re like me, you tend to have anywhere from 3-20 tabs and multiple windows in Chrome open at the same time. I have even caught myself leaving a few tabs open until I have time to look at it later. TabCloud allows you to save groups of tabs and open them at a later time (pictured). Perfect for coming back later to check out a resource or for preparing a group of sites for a particular lesson.
- Honey
 – Ok so this one is a fun one (although, I know educators often tend to buy their own supplies). Have you ever been shopping online, and then you spend more time searching for a coupon code than you did actually shopping for the item? Honey hangs out with your extensions and lights up orange when it detects you are on a website where it might be able to save you some money. At checkout, run Honey and the extension will try to apply all the coupon codes it can find on the internet (pictured). If any will work, it will automatically apply them to your cart. Viola! Money back in your pocket.
- Custom Search Engines– Out of all these tips, this is probably the one I use the most. Are there a couple of websites that you constantly find yourself visiting and searching? Searching for documents in Google Drive all the time? Videos on YouTube? Your school’s website?Well there is a much faster way to search the site than going to the website, finding the search bar and entering your search terms. By creating a custom search engine, you can enter a keyword (or letter) of your choosing into the Omnibox (Chrome’s address bar) no matter which site you are on, then press TAB and then enter your search terms. When you press enter, Chrome will bring you directly to the search results on that particular website.For example, I use this feature for Google Drive to search for documents hundreds of times per week. My keyword for Drive is just the letter “d”, so I type “d [TAB]” and then my search terms. You will also start getting Google’s suggested answers which populate below the Omnibox for quick selection. It ends up looking like this:

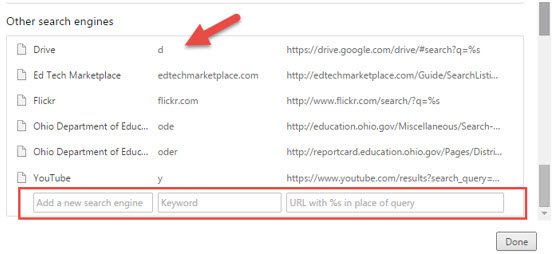
You can create custom searches in your Google Chrome Settings under Search. Select manage search engines. Under Other Search Engines, you will see a list of sites you have been to and searched before (sometimes they all do not appear). If you see a site you often search, change the keyword (middle column) to something as simple as one letter (ex. “d” for Google Drive). Click Done when you’re finished. But what if you don’t see a site you frequently search listed in other search engines? Don’t worry, you can add your own at the very bottom of the Other Search Engines! Just open a new tab in Chrome and go to the site you would like to add. Find the search bar on the site and enter “%S” as your search terms. After the search results page loads, copy and paste that URL into the third column of your Chrome settings/Other search engines. You will need to remove “25” in between the % and the S, so it just reads “%s”. Enter the name of the site in the first column, choose your keyword for the second column that you will use to search the site, press enter when you are finished and then select done. Now give it a try in a new tab. If the Omnibox doesn’t switch to “Search: SITE NAME” after you enter your keyword and TAB, then something went wrong. I’ve listed a couple of the URLs you can use to get you started.
- Google Drive (enter your own keyword or letter): https://drive.google.com/drive/#search?q=%s
- YouTube (enter your own keyword or letter): https://www.youtube.com/results?search_query=%s
- Ohio Department of Education (enter your own keyword or letter): https://education.ohio.gov/Miscellaneous/Search-Results?q=%s
- Twitter (enter your own keyword or letter):
https://twitter.com/search?q=%s
 the functionality of Chrome for just about any website. Extensions live to the right of your omnibox (the omnibox is Google’s name for the address bar) and can do a number of things. If you have never been to the
 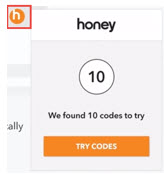 – Ok so this one is a fun one (although, I know educators often tend to buy their own supplies). Have you ever been shopping online, and then you spend more time searching for a coupon code than you did actually shopping for the item? Honey hangs out with your extensions and lights up orange when it detects you are on a website where it might be able to save you some money. At checkout, run Honey and the extension will try to apply all the coupon codes it can find on the internet (pictured). If any will work, it will automatically apply them to your cart. Viola! Money back in your pocket.
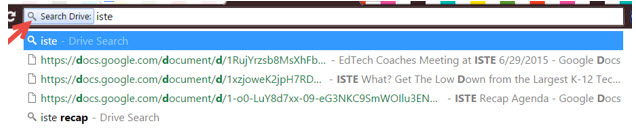
 But what if you don’t see a site you frequently search listed in other search engines? Don’t worry, you can add your own at the very bottom of the Other Search Engines! Just open a new tab in Chrome and go to the site you would like to add. Find the search bar on the site and enter “%S” as your search terms. After the search results page loads, copy and paste that URL into the third column of your Chrome settings/Other search engines. You will need to remove “25” in between the % and the S, so it just reads “%s”. Enter the name of the site in the first column, choose your keyword for the second column that you will use to search the site, press enter when you are finished and then select done. Now give it a try in a new tab. If the Omnibox doesn’t switch to “Search: SITE NAME” after you enter your keyword and TAB, then something went wrong. I’ve listed a couple of the URLs you can use to get you started.
Google Drive in the Fast Lane
Not a day goes by that I don’t use Google Drive. As is, Drive offers an incredible amount of functionality, increased productivity and time saved searching for documents, emailing documents back and forth and so much more. If you want to speed up your time and increase your productivity in Drive even more, check out these tips below to get your Drive ready to go back to school.
- Get Organized
 – this could end up being the tip that takes you the most time, depending on how your Drive is organized (or not organized) now. However, it will save you headaches throughout the school year. If you don’t typically use folders, create some in drive. You can create folders inside of folders inside of folders. Drive makes it incredibly easy to move documents and folders around to get organized; just drag and drop documents (or entire folders) in your Drive into another folder. If you’re not one to use folders, I would start by creating the
  following folders:
- one for each prep/bell you will teach
 – this could end up being the tip that takes you the most time, depending on how your Drive is organized (or not organized) now. However, it will save you headaches throughout the school year. If you don’t typically use folders, create some in drive. You can create folders inside of folders inside of folders. Drive makes it incredibly easy to move documents and folders around to get organized; just drag and drop documents (or entire folders) in your Drive into another folder. If you’re not one to use folders, I would start by creating the
 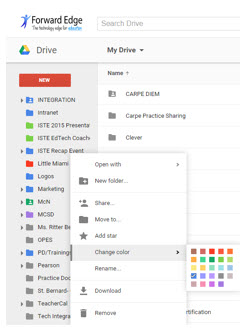 following folders:
i. inside of each of those folders, I would also create a folder for each unit you teach (you can create them throughout the year)
- You may want to add additional folders inside each unit for class work, homework, assessments and parent correspondence
- school documents
- any committees on which you serve
- any teams/clubs you coach/moderate
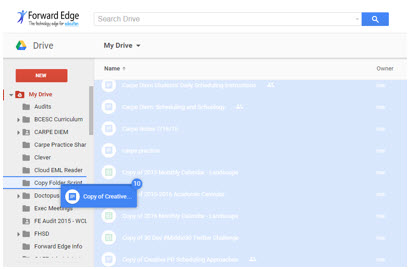
Bonus: You can color code folders in Drive now! Just right click on a folder, go to change color and select a color (pictured).
Get everything as prepared and organized as you can ahead of time, but remember- what was Google first known for? Their search engine! Google brings that search engine power to all of their apps. If you spend more than a couple minutes going through folders looking for a document, try the search bar at the top of your drive.
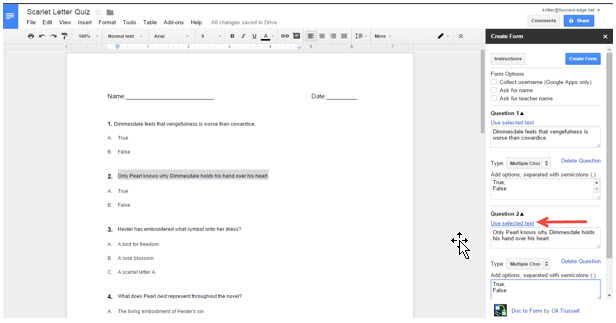
- Install Doc to Form Add-on for Docs– Have you been wanting to start giving more online assessments, but you’ve been having trouble finding the time to create a new assessment in Forms (after all, it’s already typed in a Word Document). Well now there’s an add-on (sort of like extensions for Drive) in Google Docs that helps with that conversion process.You can upload your existing Word document to Drive and convert it to a Google Doc (just select Open in Docs to convert it). Once you have Google Docs open, go to Add-ons at the top, and select Get Add-ons. Search for Doc to Form in the Chrome web store. Once you’ve installed it, it will be available in every Google Doc.

To run the add-on, go back up to Add-ons, go down to Doc to Form and select Create Form from Doc. There will be a little bit of copying and pasting that you’ll have to do, but it will save you a lot of time switching back and forth between windows and programs.Once you’ve got everything transferred over that you can, select View Form to see the live form. You can make any edits or add any questions that you need to once the form is open. Remember, when you create a Google Form, a Google Spreadsheet is automatically created for you to collect the answers! Try starting with Doc to Form with any About Me activities and contact information you collect from students and parents at the beginning of the year. You’ll have all the information saved in a nice, easy to find, spreadsheet all year!If you’re interested in an Add-on that will grade a Google Form in seconds, check out the next tip.
 - Install Flubaroo Add-On for Google Sheets– Once you start using Google Forms for
 assessments, you’ll fall in love with Flubaroo! Flubaroo will grade a Google Form for you in seconds. After installing Flubaroo for the first time, it will be available every time you open a Google Sheet. Why Sheets, not Forms? Because the responses from a Form are stored in Sheets. You can install Flubaroo by going to Add-ons in a Google Sheet and selecting Get Add-ons. Search for Flubaroo and install it. Once it is installed, you can run Flubaroo by going back up to Add-ons, Flubaroo and selecting Enable Flubaroo for this Sheet. Flubaroo is very easy to use; just remember to take the form once as the answer key.Once you grade the assessment, Flubaroo will create another tab in your response spreadsheet and give you a breakdown of all the correct/incorrect responses. You can tell immediately which questions/topics need to be taught again to the whole class or small groups. You can also email students their grades (if you collected email addresses in the form) by going back to Flubaroo in the Add-on menu and selecting email grades.Many gradebooks will let you import grades from a CSV file, and you can download Google Sheets as CSV files. If you want to do this and your gradebook will allow you to import files, just don’t forget to collect the students’ ID#s in your form- this will likely be the field your gradebook would need to import the grades and associate them with the correct students.
 *these images are from the Flubaroo listing in the Chrome Web StoreIf you already know about Flubaroo, you may not know that they released some new features in June of 2015. Flubaroo now supports more languages, has faster grading and allows you to grade by hand for short answer, essays and even picture responses taken on students smartphones!
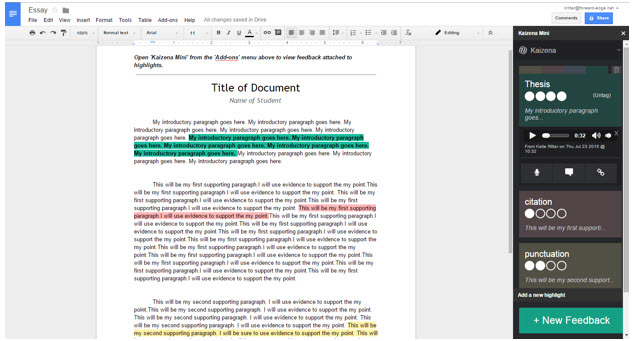
 - Install Kaizena Mini Add-on for Docs– Kaizena is a tool that integrates with Google Docs and allows you to leave audio feedback in the same way you can leave comments on Documents. This is two-fold. First and foremost, leaving timely and meaningful feedback is extremely important for student improvement. By leaving a recorded message, it allows you to connect more personally with the student. You will also be more likely to give a longer, more detailed explanation for your comment because most of us can speak faster than we can type. Your Students (or peers if you’re using it with colleagues) will also need to install the add-on to receive the feedback.
 To install Kaizena Mini, go to Add-ons in a Google Document and then select Get Add-ons. Search and install Kaizena Mini, which will now be available in all Google Documents. You can manage Skills and Lessons (concepts or comments you frequently repeat) at Kaizena.com. This allows you to save and use audio or written comments over and over. You can also color code your comments to group like-topics together. With Kaizena, you will be able to give more and better feedback in less time!
 - Install Translate Add-on for Docs– Have ELL/ESL students in your classroom or parents of some of your kiddos in class? Use Google’s Translate Add-on to quickly translate documents for them. Of course, it’s not perfect, but it’s a great starting point to making your classrooms and schools more inclusive.To install Translate, go to Add-ons in a Google Document and then select Get Add-ons. Search and install Translate, which will now be available in all Google Documents.
 form. You can make any edits or add any questions that you need to once the form is open. Remember, when you create a Google Form, a Google Spreadsheet is automatically created for you to collect the answers! Try starting with Doc to Form with any About Me activities and contact information you collect from students and parents at the beginning of the year. You’ll have all the information saved in a nice, easy to find, spreadsheet all year!If you’re interested in an Add-on that will grade a Google Form in seconds, check out the next tip.
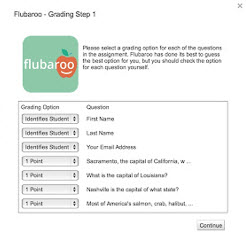 assessments, you’ll fall in love with Flubaroo! Flubaroo will grade a Google Form for you in seconds. After installing Flubaroo for the first time, it will be available every time you open a Google Sheet. Why Sheets, not Forms? Because the responses from a Form are stored in Sheets. You can install Flubaroo by going to Add-ons in a Google Sheet and selecting Get Add-ons. Search for
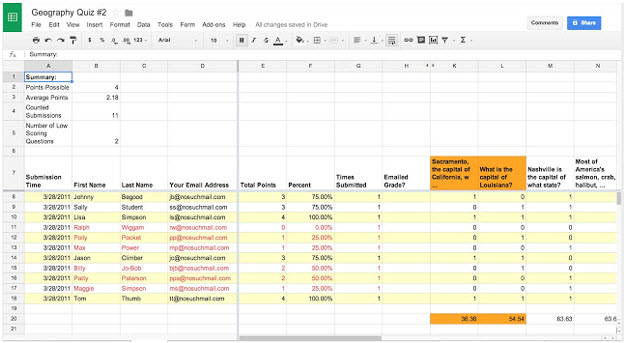
 To install Kaizena Mini, go to Add-ons in a Google Document and then select Get Add-ons. Search and
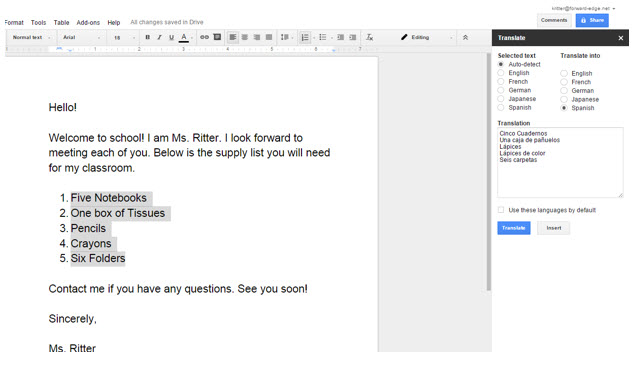
11 Steps Closer to a Smooth School Year
Now when the teachers start funneling in for the back-to-school meetings, the hallways start buzzing with stories about summer break and the seats start filling up with students, you’ll be ready for them!
What are your back to school Google tips?
Forward Edge is a full-service K-12 technology service provider in Cincinnati, OH. We offer valuable assistance in Managed Technology Services, such as on-site technicians to assist in all your time-crucial and need-right-now technology needs, along with in depth network oversight, wireless infrastructure, server management, and much more!
In addition, Forward Edge also offers help developing technology integration skills via our Curriculum and Integration department. By utilizing the ISTE Standards for Coaches, Educators and Students, certifications in Google For Education, and experience with the latest technology, we provide a wide range of services like Professional Development, 1-on-1 Coaching, On-Site Coaching, Bootcamps, Webinars and more, all which deliver big benefits to your team.
Contact Forward Edge today about the variety of services we offer! Learn more about our services via our website, by reaching us via calling (513)761-3343, or sending an email to info@forward-edge.net